Friday, October 13, 2017

How to apply for New Zealand Visa [Filipino Citizens]

8000 km away from the Philippines lies an uncrowded, green and peaceful country of New Zealand. Situated down under, the country is famous for its post-card perfect landscapes, sceneries and culture.

I have been fascinated with New Zealand's(Maori people)  culture specifically their traditional dance "HAKA". But before daydreaming about this stuff, we Filipinos(having Philippine Passport) traveling as a tourist, need a visa to enter the country but luckily the visa-fee is waived(if planning to stay less then 60 days) for us meaning we will save a huge amount of money(NZD165 around 6,000 PHP).

In this article, I will be listing out all the process and the experiences I have undergone while applying a New Zealand Visitor Visa. Visitor visa allows you to visit the country as a tourist, visit friends and relatives, play some sports or perform in cultural events without pay, get married and if you are to undertake a short-term study.

Just like my other Visa guides, Everything here was based on my personal experiences.

Part I: Requirements


Duly filled up Application Form


Here is the link for the application form: click here. Please note that you need to fill up every item and never leave blank space but rather add "N/A". Also, double check what you have written there.

Identity (You must provide proof of your identity)


  • You need to prepare your valid Philippine passport. Must have at least 6 pages of vacant page and xerox copy of the bio page
  • 2 acceptable photos

Funds or sponsorship (You must have enough money to live on while in NZ or have an acceptable sponsor)


You must have at least NZ $1,000 per month, or NZ $400 per month if you’ve already paid for your accommodation. Also, provide a xerox copy of each file submitted.

Evidence can include :
  • proof of accommodation pre-payment, like hotel pre-paid vouchers or receipts
  • bank statements
  • credit card statements
  • bank drafts
  • travelers’ cheques
  • a 'Sponsorship Form for Temporary Entry' completed by an acceptable sponsor.
If you are sponsored, your sponsor must provide evidence they can look after you in New Zealand. Evidence can include:
  • recent bank statements
  • pay slips
  • employment agreement
  • accommodation ownership or payment of rent.


Onward Travel (You must have a ticket to leave New Zealand or be sponsored for the cost of your onward travel)


Evidence can include:
  • proof you have enough money to buy a ticket out of New Zealand, in addition to the funds you have to live on
  • your travel ticket
  • a 'Sponsorship Form for Temporary Entry' completed by an acceptable sponsor.
If you are sponsored, your sponsor must provide evidence they can look after you in New Zealand. Evidence can include:
  • recent bank statements
  • pay slips
  • employment agreement
  • accommodation ownership or payment of rent
For more information you may visit New Zealand Immigration: click here

Optional Documents


  • Certificate of Employment (if employed)
  • Business Registration / Permits (if businessman)
  • Income Tax Return (ITR)

In my case, as a regular employee, I submitted the following documents below and I have xerox copied every single one of them:

  • Valid Philippine passport 
  • NZ visitor visa application form
  • NSO Birth Certificate
  • 2 copies of Passport size photo (35mm x 45mm in dimension with white background)
  • Bank Statement with a signature from the bank manager. 
  • Credit Card statement
  • Income Tax Return (ITR)
  • Certificate of Employment indicating my tenure, position, salary and etc.
  • Roundtrip Tickets ( From Philippines to Australia and Australia to New Zealand from Cebu Pacific Piso fare and $5 sale of Jetstar :))
Please note that I don't have any sponsor. Also, you may notice that I did not submit any accommodation booking as I am planning to do Couchsurfing or stay with a friend. If you ask how much money I have in the bank, it is less than 50,000 PHP.

Part II: How to apply


After gathering the requirements, I finally decided to submit my application. I submitted my application via (VFS global)  New Zealand Visa Application center in Cebu (your representative may also submit it for you). Refer to the address below:

Cebu
VFS Global Services Philippines Private Inc.,
9th Floor, Keppel Center, Unit 905, Samar Loop
cor. Cardinal Rosales Avenue,
Cebu Business Park, Cebu City 6000

Manila
VFS Global Services Philippines Private Inc.,
Mezzanine Floor Unit M01, Ecoplaza Building,
2305 Chino Roces Avenue Extension Makati City, Metro Manila 1231

The VFS agent double checked the requirements that I brought and ask me for some minor questions. After checking and when everything was aligned, the agent then asked me to pay the following fees below, take note that this is VFS fees and not the visa fee as the visitor visa-fee is already waived for us Filipinos. My application will be forwarded to Manila and that the courier service will just deliver it to the address I added to the application. After submitting, the agent handed me something like a claiming stub that I need to present to the courier delivery, also in it is some information about the application in case you have questions. Please note that New Zealand Visa Application Centre will accept all of the payment in PHP currency only and they accept cash, credit card, bank transfer and etc.

VFS service fees

Part III: Processing


After paying the fees and submitting the requirements, I receive a text message from VFS acknowledging that my application was received and thus provided me with tracking number. The next day I received another text message informing me that my application is now under process at the New Zealand Embassy in Manila. From then on, I never heard from them till 4 days later where I receive another text informing me that my processed application has been dispatched. So I was thinking that the result might be in and that my passport will be delivered to me soon. The next day I received a call from the courier and inform me that they will deliver my passport and that if I am available to receive it. Fast forward I got my passport and went searching for the visa and pufffffff it was there. I was granted with a multiple entry visitor visa.

To give you a summary:

Date Event
9/10/2017 ~  9/13/2017  Fill up the application form, gather and scan the documents.
9/13/2017 Submitted my application and Acknowledgement was received.
9/14/2017 Application is under process in New Zealand Embassy in Manila
9/14/2017 ~  9/17/2017  Waiting for results.
9/18/2017 Processed application has been dispatched 
9/19/2017 Received my passport with the visa

My Multiple Entry New Zealand Visa

Have you tried applying for New Zealand visa? Share your stories and experience in the comment section below. 

Thursday, October 12, 2017

How to apply for Australian Visa [Filipino Citizens]

Australia, the land down under, surrounded by great oceans and vast land, it is definitely a must go for people who love nature. Famous for its Koalas, Kangaroos and its overly diverse wildlife, there are more to that that Australia can offer.

But before you can proceed in exploring them,  Filipinos need a VISA to enter the country. Luckily, Australia is much more welcoming compared to other western countries by how they ease the visa application for each individual by having it done ONLINE.

In this article, I will be listing out all the process and the experiences I have undergone while applying an Australian Tourist Visa [Visitor visa (subclass 600) ] ONLINE. Just like my other Visa guides, Everything here was based on my personal experiences.

To give you an overview, here are the steps you need to do:

  1. Create an Account with Australian Government Department of Immigration and border protection.
  2. Fill up application form for Visitor Visa Subclass 600
  3. Upload Supporting documents needed
  4. Pay the visa fee
  5. Wait for result


Let's get started, MATE! 


Creating an Account


In order to jumpstart with the online visa application, you need to create an ImmiAccount.
Here is the registration page: Click here

You should see something like below.
ImmiAccount Registration Page
Once you have successfully registered, try logging in to your account. Once logged in, click on the "New application" which is found at the upper left corner of the page. In the New application section click on "Visitor" and under it click "Visitor Visa(600)". From here you are now ready to start filling up the application form.

Fill up application form


In every visa application in general, I always don't leave empty or blank space and just add N/A if in case I don't have it or doesn't  apply to me.

Start of  the application 
Items in the application are self-explanatory. All you need to do is read them carefully and answer them. Be sure to answer all items required and double check them. In case you cannot finish the application in one go, you may save and continue later before submitting.

Attaching supporting documents


After filling up the application, you will now proceed in attaching your supporting documents.
Please refer to the checklist of documents for this application for more information about what to attach.

In each category below, you need to add a supporting document for them. 

Category for supporting documents.

The Australian Government sets a limit of 30 files for Visitor Visa online applications, and files must not exceed more than 5MB in size. In order to keep up with the limit, they recommend that you scan your documents at 96 dpi, and not to attach photos in Office document files, as this will increase the file size.

Below are the documents that I have attached.

Supporting documents that I submitted

Financial Capacity - Personal, Evidence of 


  • A copy of my Bank Statement plus a Bank certificate. If you ask how much was inside my account, It was less than 50,000 PHP.
  • A copy of my Credit Card statement of account.
  • A copy of my 2016 Income Tax Return.
  • A copy of my Certificate of Employement where it indicates my tenure, position, my salary and etc.

Note: If you are a freelancer you may add your contract details or payslips and if you are a businessman, you may add a copy of your business permit/registration. Also if you have sponsors, you may add your sponsor's documents such as payslip, COE and etc.


Planned tourism activities, Evidence of


  • A copy of my rough planned activity in Australia (though I am not going to follow it).

Planned Activity


  • A copy of my flight ticket to Australia (Since I book it in advance via Cebu Pacific Piso fare, thanks, Cebu Pac!)


Note: It is not recommended to buy a ticket without a visa first. If you have a sponsor a letter of invitation can also be added here.


Travel Document


  • A copy of my Current Passport Bio.
  • A copy of a passport size photo( dimension should be 45 mm x 35 mm)


Travel history, Evidence of


  • A copy of my expired and existing visas, as well as entry/exit stamped pages of my current and old passport.


Birth or Age, Evidence of


  • A copy of my NSO birth certificate.

They say you need to have your documents certified or notarized but in my case, I did not do this but still, it was accepted. Just to emphasize, I am not saying or promoting of skipping this process, just to be on the safe side better have it notarized.

Once you have attached every required supporting document per category, Please do another round of check before submitting. Once everything is in place and you are now confident, hit submit and proceed to the next step which is paying for the visa fee.

Paying the visa fee


After submitting your documents and forms you will now be prompted to pay the visa fee. You may pay using credit or debit card. The visa fee is around 140 AUD + the surcharge of around 1% if paid via credit card. For convenience, I paid the fee via credit card and the transaction was around 6,027.06 PHP considering the PHP(Sept 2017) is really low that time. After paying, you will receive an acknowledgment email that your application is received.

Waiting for result


This will be the hardest and the thrilling part of the application process, the waiting for results.

In general processing times for the application depends and will be assessed on a case by case basis and actual processing times can vary due to individual circumstances. If the Australian Government needs /request more documents from you they will inform you in the email.

From the time I submitted my application, it took around 7 days to hear from them again and that informing me of a visa grant. I was granted with 1 yr multiple entry tourist visa.


To give you a greater picture of the timeline of the entire process below:

Date Event
9/6/2017 Created an ImmiAccount
9/6/2017 ~  9/10/2017  Fill up the application form, gather and scan the documents.
9/11/2017 Submitted my application and Acknowledgement was received.
9/11/2017 ~  9/17/2017  Waiting for results.
9/18/2017 Received an email with the Visa Grant.

I find this process fast, easy and convenient and would recommend it to anybody.

My Visa Grant notice.

Have you tried applying for Australian visa? Share your stories and experience in the comment section below.  

Friday, March 31, 2017

KYOTO : The must-see places.

Kyoto was once the imperial capital and center of Japan. A city where a countless of temples, shrines and other historically priceless structures are found and are still standing up to this day and some were named as a World Cultural Heritage Sites. A place where it is rich in culture and tradition. There is something in Kyoto that attracts travelers from around the world, definitely its history and people.

Kyoto has been my favorite city in Japan since the day I laid my eyes and set foot in it. It always amuses me as everywhere you go it seems there are hidden stories behind each place which I am curious about. Here are some places which I think is a must-see in Kyoto Japan.

Arashiyama

Arashiyama is located in the western part of Kyoto. It is famous for its bamboo forest but honestly, there are more interesting spots in this area than that. There are shrines and temples in the area, some beautiful garden and small shops where you can eat and enjoy local food.

Bamboo Forest In Arashiyama
Shinto shrine in Arashiyama
If you are fond of walking, just a tip is that if you walk further in the bamboo forest you can enjoy a tourist-free portion of it. I randomly walked around the area and I found a Japanese traditional house open to the public where you can check what it looks like inside. The locals within the area are also offering their own tea ceremony at a small fee, this way you can get a chance to experience and interact with locals.

A random neighborhood in Arashiyama.
You are welcome to check inside.
Train Tracks and tourist riding a rickshaw
On the other side of Arashiyama by crossing the Togetsukyo Bridge, there are also interesting places to visit such as shops and small villages.

Togetsukyo Bridge

For me, I would say that the minimum time to spend in Arashiyama would be a half day to a week, If you are visiting for a couple of hours then I am afraid you would not enjoy the beauty of the area.

Kinkaku-ji

Kinkaku-ji is a zen Buddhist temple located in the northern part of Kyoto. It is one of the famous buildings in Japan making up the Historic Monuments of Ancient Kyoto which are World Heritage Sites.

Visiting Kinkaku-ji requires an admission fee of 400 yen.

Ticket to Kinkaku-ji

The Kinkaku-ji has 3 floors in it. The upper two levels are made up of Gold Foil on lacquer covers which echo the extravagant Kitayama culture that developed in the wealthy aristocratic circles of Kyoto during Yoshimitsu's times. Each floor represents a different style of architecture. A shining phoenix stands on top of the shingled roof.

Closer look of the Golden Pavilion
The Golden Pavilion

The first level is built in the shinden style of the 11th- century imperial aristocracy; the second level is in buke style of the warrior aristocracy(used in samurai residences) and the top level is in the Chinese zenshu-butsuden style.

The Golden Pavilion

Inside Kinkaku-ji is a pond and islets which are the center of the garden. Rocks within it are donated by various provincial lords of the period and placed throughout the garden. The garden is listed as a National Special Historic Site and Special Place of Scenic Beauty.

After passing the Golden Pavilion, you will then pass some small temples and gardens. The gardens hold a few other spots of interest including Anmintaku Pond that is said to never dry up, and statues that people throw coins at for luck.


Landscape inside the Golden Pavilion

Traditional Houses inside the Golden Pavilion
Tourist sending their offerings for luck

After the gardens, it will lead you to Sekkatei Teahouse. In this area, you will find souvenir and food shops.

Going to the shops

For me, I would say that the minimum time to spend in the Golden Pavilion would around 2-3 hours depending if you want to enjoy your tea time.

Fushimi Inari-Taisha

Fushimi Inari is a shrine located below the Mt. Inari. It is located down south of Kyoto. It can be accessible by bus from Kyoto Station (you can use the Kyoto Bus Pass) or via Train. From the bus stop or JR Station, it would take around 5 - 10 mins walk to reach the shrine itself.

Fushimi Inari

Arriving at the shrine, you will then be greeted with a huge Torii Gate. Fushimi Inari has been a patron of Businessmen, merchants, and manufacturers as Inari is a God of Rice. Each Torii gate you see in the shrines are donated by businessmen with their names engrave in it. It is said that if you placed a Torii gate in this shrine it will bring you luck on your business or your endeavors. Small Torii gates are sold around the area if you wish to try your luck.

Piles of Torii Gate

Fushimi Inari has lots of different shrines within it and there are lots of temples to go through as there is a hiking trail leading to the peak of Mt. Inari. Most tourist who came here only limit themselves into the array of Torii gates which is located near the foothills of the mountain. Either they are lazy to go up or they are just there to enjoy their selfie time. Little do they know the more you go farther from the base the less crowd you can get, so you'll probably like own the entire area and you can get the picture-perfect photo you've always wanted.

The Hiking Trail Map
The hiking trail usually takes around 2hrs depending on your pace and if you do a lot of some small stops on some of the temples and shrines that interest you. There are also vending machines along the way and the prices would really soar up depending on how far you are from the base. There is also a small lake along the way and place where you can place/offer your small torii gates you bought.

Piles of small Torii gates with the small lake behind it

It was almost dark when I started to climb up the mountain. The more you go up, the fewer people you can meet or see. Climbing alone and in the dark creates a fearsome mood as there are cemeteries along the way and it is creepy to think of.

View from the top (almost halfway, though)
Reaching the summit really is rewarding for some but do you know what's on the top? To be honest the summit is a bit of a bummer for me, I was expecting a more impressive view of the city but instead, it was a temple or a cemetery(not really sure what it is). Even said that it is still worth the climb, how would you know what's on the top by going through it right? Although it was not what I expected (my expectation was a bit high), I still learn something and seeing the history and tradition of the area plus I also burn lots of fats.hahah

Signage on the top
Temple / Cemetery at the top

For me, I would say that the minimum time to spend in the Fushimi Inari would be around 2 - 4 hours depending if you want to do the hiking trail. I still recommend the hiking part especially if you do it at night time.

Kiyomizu Dera

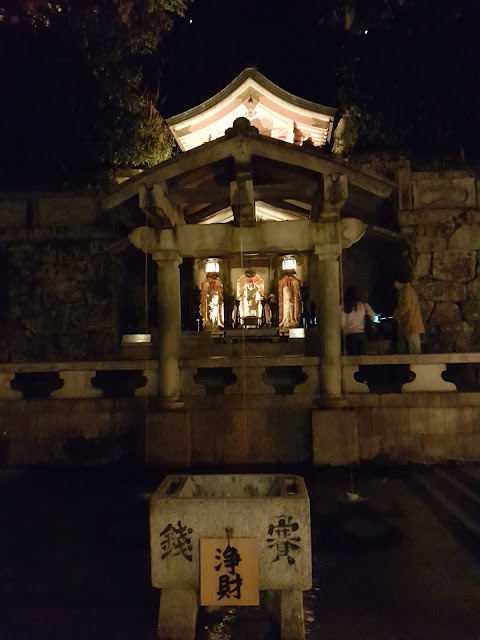
Located halfway up Otowa Mountain in the eastern part of Kyoto, Kiyomizu-dera is a historic temple that was established in 778, even before Kyoto became the capital of Japan. The temple has been burned down many times and the current building was rebuilt by the third Shogun.

The Main Hall(Hondo) of the temple is designated as a national treasure. The temple was registered on the UNESCO World Cultural Heritage List as one of the Historic Monuments of Ancient Kyoto.

I decided to visit Kiyomizu-dera at night as I heard there are special night viewing on spring and might as well check how it looks like at night. The entrance fee was around 400 yen for adults and 200 yen for students.

Temple in Kiyomizu-dera 
Children show at Niou- Mon gate

Niou-mon is a magnificent gate in the Maromachi style. The gate is called "Akamon (Red gate)." When I visited it there were children singing just below the gate.

Children show at Niou- Mon gate

The two most famous parts of the temple are the Main Hall, where the Eleven-Headed and Thousand Armed Kannon Bodhisattva - which is famous for its power of answering prayers - is enshrined, and Kiyomizu Stage, the veranda of the Main Hall, which extends over a precipice.

A Pagoda just after the entrance

A huge bell right after the entrance.
Upon entering the temple, I was curious on an exhibit that depicts how ancient Buddhists usually lived and do in a basement. For a donation of 100 yen, you get the chance to experience to go through an underground passage which was very dark with barefoot and without any light to go through the other end of it. It was a quick and a bit scary journey but then I will leave it to you on what you will see underground once you are there.

Tourist paying their tribute
Kiyomizu-dera is the temple of the Goddess of Mercy, a symbol of religious belief for more than 1,200 years.

I went to the Main Hall and the view was fascinating at night. You can see the entire city of Kyoto with its colorful lights.

View from the Hall
It was relaxing seeing those lights that shine like diamonds. The gardens were also lit up well and it was very serene.

A small pond inside the temple

The area was so big that I even don't know which parts to check first as all of them are inviting. So I just randomly go through each of them once and then went back to the exit part. Upon reaching the exit, I heard a girl playing on traditional Japanese music beside the Niou-Mon Gate, so I decided to stay and listen for a while. It was really relaxing listening to it to as it is like you are transported back to ancient Kyoto.

Japanese Girl Playing Traditional Music

For me, I would say that the minimum time to spend in the Kiyomizu-dera would be around 3 - 5 hours depending if you want to relax and enjoy the beauty of it.


There are lots of places to go to and things to do in Kyoto like the Gion Area to see a real Geisha, The Imperial Palace in Kyoto, Philosophers walk. Traditional Onsen and much more. Kyoto has been my favorite city in Japan out of the city that I've been to and will definitely stay here for the next visit that I will make in Japan.

The above temples/attractions are my recommendation if you want to check the best of Kyoto and are having a limited time and hard time choosing for which temple/attraction to visit.

Have you been to Kyoto? Share your stories and experiences below.

Thursday, March 23, 2017

A day trip to Nara (Japan)

Just less than an hour by train from Osaka or Kyoto, Nara is one of the famous day trip destination in the Kansai Region. Situated in the eastern part of the Kansai Region, Nara had once been the capital of Japan from 710 to 794. Nara may not be as exciting as its neighboring cities like Kyoto and Osaka, Nara has its own charm and is home to no less than 8 UNESCO World Heritage Sites.

Welcome to Nara

Arriving from major train lines such as JR Nara Station or Nara Kintetsu Station, it would be easy for you to move around as the attractions are just reachable by walking. Just outside JR Nara Station is the tourist information center where you can ask for information and free map.

While walking in the streets of Nara going to the attractions, shops are found along the way. I highly recommend trying the traditional Nara food which is the "Mochi". It is a green colored snack with beans in it. Don't mistake it for a green tea or matcha base food, it is quite different and locals say it is made of grass from Nara.

Walking through the streets in Nara

Here are the things to expect when visiting Nara for a day.

Oh, my Deer, They are Everywhere!


To those people who have been to Nara before, the first thing they associate Nara with is 'Deer'. Deer are found everywhere in Nara. These deer can freely roam the streets and parks of Nara. It has the VIP status making them unharmed and famous in the area. It is also the most iconic animal in Nara. It has been a belief that the deer were the designated messengers of God before Buddhism flourished. With that, it became a tourist attraction in the area and is one of the top reason why travelers visit Nara.

Whats up?


A deer who went shopping.. hehe

yo 

Deer in Nara are friendly in nature. They were already used to tourist feeding them with junk foods and petting them but authorities advise tourist to be careful all the time as there were deer attacks in the past making them install a friendly reminder to tourist to be careful which is seen across the area. Deer food is also sold in some shops for 150 yen.

Temples and Parks


There are lots of temple and Parks to visit in Nara. Most of which are just within walking distance with each other and some are free of charge.

The Kofuku-Ji Temple (興福寺) is used to be a family temple of a famous powerful family clan in Nara.  The five-story pagoda which is one of the tallest pagodas in Japan is also a symbol and famous landmark in Nara. Opening hours: Daily 9:00 am – 5:00 pm


five-story pagoda in Nara
The Kofuku-Ji Temple in Nara


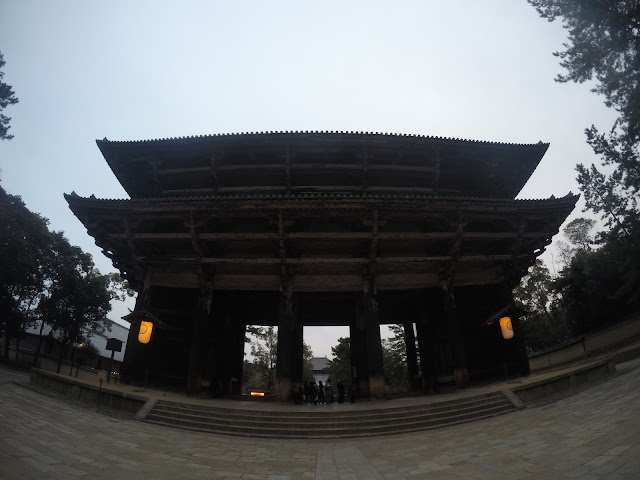
The Todai-Ji Temple (東大寺) is the largest wooden structure temple in the world. It is also the main attraction in Nara. There is an entrance to the main temple where you can see a massive Vairocana statue, popularly known as Daibutsu (Great Buddha). It was burned down twice in fires that broke out as result of war. Opening hours: Daily 8:00 am – 5:00 pm. 

Entrance to Todai-ji Temple

Side view

If you happen to visit Nara around March, they are celebrating the Omizutori Festival by that time. It is an annual Buddhist festival in Nara that welcomes Spring with a number of rituals and ceremonies. It's one of Japan's oldest festivals. Each night of the festival large torches is lit outside Nigatsudo Hall at Todaiji Temple in a specular fire show. Viewing this fire display is thought to bring good luck to the audience.

The Nigatsudo Hall is made up entirely wood and it is really a challenge for those men not to burn it. In the past, there were lots of temples already burnt out in Nara. The activity is said to clean the impurity and irradicate the bad things in the world just like lighting a firecracker on a new year for us Filipinos.

People waiting for the Fire show Festival at Nigatsudo Hall
Omizutori Festival in Nara

Initially, I wasn't aware of this festival. I was just lured by other travelers and locals flocking to this area. At first, I really don't know what it is all about until I ask some locals and Policemen who knew how to speak English. Also at the start of the event, they also give an introduction to the said activity in English / Japanese and Chinese, what it is all about and why it is done.


The famous park which is the Nara Park where you will find a lot of deer roaming around. It is a nice place to relax. This is the best place to feed the deer and hang out with them. It also a nice place to do biking.


A pond in Nara going to Nara Park

Deer waiting to be fed in Nara Park

Have you been to Nara? Share your stories and experiences below.

Thursday, March 16, 2017

Japan Rail Pass (JR PASS) : Is it worth it?

If there is something that Japanese are known for, it's their advanced and high technology. From fancy vending machines, sophisticated toilets to efficient transport systems, Japanese are experts in this field.

There are plenty of ways to travel within Japan but there seems to be a Pass which is famous among foreign tourist which is the Japan Rail Pass or the JR Pass. This article will talk all about the JR Pass if it's worth it or suitable to your travel in Japan.

What is a Japan Rail Pass (JR PASS)?

The Japan Rail Pass (also commonly called JR Pass) is a very cost effective rail pass for long distance train travel in Japan. It can be used by foreign tourists only and offers unlimited use of JR trains for one, two or three weeks at a minimal cost. Described by Lonely Planet as ‘one of the world’s greatest travel bargains’ that residents of Japan can only dream of.

How to Purchase a JR PASS?

The JR pass can only be purchase and use by tourist. It has to be purchased before arriving in Japan. This can be purchased through several accredited travel agencies within your country(For Philippines: Discovery Tours is one) or you can order them online(such as Inside Japan) and have it delivered to your doorstep. 

There are two types of JAPAN RAIL PASS: Green (for superior-class Green cars), and Ordinary. Each of these types is available as a 7-day, 14-day, or 21-day PASS. 

Current Prices as of Oct 2016:

Ticket Prices

How to use the JR PASS?

Upon purchasing, The agency will send a voucher for you to exchange for the actual pass at one of the JR ticket offices when you arrive in Japan(See here for the list). To redeem the pass you must bring along your passport as proof that you have entered the country on a ‘temporary visitor’ visa, or prove that you are a Japanese national whose permanent residence is now outside of Japan and the voucher itself. Please note that the voucher is non-transferable upon purchase.There are no date restrictions on the voucher and you do not need to start using the pass from the date you exchange your voucher; you can select any date within a one month period as your starting date. However, once you’ve been issued with your printed pass, the starting date cannot be changed, so make sure you’ve selected the right date beforehand.

In order to use this pass, you need to bypass the electronic ticket gates and proceed to the lane where there is a manned ticket office and show them your pass. Make sure to bring your passport during this time as there are cases that they will inspect your pass if it is registered to you.

Validity of the JR PASS

The JR pass is valid through six companies comprising the Japan Railways Group (JR Group). You can enjoy unlimited Railway, Bus and even ferry for as long as it is within the JR Group. For the entire list of Railway, Buses, and Ferry valid for JR Pass check here.

For more detailed info, Please visit the Japan Rail Pass  here.

Does getting a JR PASS worth it?

With all the information above, the question is, Is the pass worth it? For me, it really boils down to your planned Itinerary and how well you organized it. In order to get a better picture of what I am talking about let's take a few examples. 

Take note: Prices indicated in the example below are estimatesFor every example below, The column JR COST - is an estimated cost of transport by buying the ticket individually and comparing the total cost on this column to the price of the 7 days JR PASS. For the cheaper options column are the mixed mode of transport in which it will list the possible cheaper option for the same route.

Example  1: 

Person X is spending 7 days in Japan, arriving and departing in Tokyo. Person X wants to visit Tokyo & surrounding areas. Person X is staying at Asakusa Area and wants to explore areas within Tokyo(Shibuya, Shinjuku, Akihabara, Ginza, Odaiba, Roppongi) and will go for a day trip to Mount Fuji and Disneyland.


If a 7 day JR pass is used which cost around ¥29,000+ on the above itinerary, it is not worth it as the price of purchasing the tickets individually is cheaper than the pass itself. Surprisingly by taking other options, you can see that there is a huge difference between the two options.

Example 2:

Person Y is spending 7 days in Japan, arriving and departing in Tokyo. Person Y wants to visit Tokyo & other cities such as Osaka, Kyoto, and Nara. 


If a 7 day JR pass is used which cost around ¥29,000+ on the above itinerary, then you may save a lot by using it but surprisingly by taking other options, you can see that there is a huge difference between the two options.

Example 3:

Person Z is spending 7 days in Japan, arriving in Osaka and departing in Tokyo. Person Z wants to visit Tokyo & other cities such as Osaka, Kyoto, and Nara.


If a 7 day JR pass is used which cost around ¥29,000+ on the above itinerary, it is not worth it as the price of purchasing the tickets individually is cheaper than the pass itself. Surprisingly by taking other options, you can see that there is a huge difference between the two options.


Out of this following examples, we can say that there is a huge different within the options presented and that itinerary had huge role on your spending. 

In General, JR PASS is not worth it when:

  • You are a budget traveler and want to save by going through other cheaper options.
  • You will not be traveling longer distance travel more often and will not be using JR lines.
  • You are focusing on bigger cities which have their own local unlimited transportation pass.
  • You are fine not traveling in comfort and if you are OK with traveling at a slow pace.
If all the items above doesn't  describe your trip behavior or flow, then you are better off with having the JR PASS.


In my opinion, for a backpacker and budget traveler like me who always finds a cheaper option to anything, I would personally discourage budget travelers to get the JR Pass as you clearly see a huge difference between the prices and it is quite expensive and not worth it.

In order to save a lot, make use of the buses as it is one of the cheaper options out there.The overnight bus between Tokyo and Osaka are very cheap and thus saving a night of accommodation, the cheapest I saw was around ¥2000 one way. Also, make use of the unlimited transportation in every city like the unlimited bus ride in Kyoto for ¥500 which will take you to almost all of the attractions in the city, a one-way bus fare in Kyoto cost around ¥210. While in Tokyo, the Tokyo Metro unlimited subway pass which allows you to take unlimited subway ride within Tokyo but only limited to Tokyo Metro and Subways (excluding JR lines) which cost depending on how many days you want it, a day will cost for ¥800, 2 for ¥1,200 and 3 for ¥1,500, the one way railway trip within Tokyo will cost you around ¥160 depending your destination. There are plenty of customized pass valid for specific city or region, you just need to check which one is appropriate for you depending on your planned trip.

For more info:
Tokyo Metro unlimited subway pass here
Kyoto Unlimited bus pass here
Highway bus here

At the end of the day, as long as we are enjoying our trip by any means is still our utmost goal while traveling. As a saying goes "It's not about the destination, but the journey that matters most". 

Have you tried the JR PASS? Share your stories and experiences below.